Part 01. Install R and Rcmdr
Learning objectives
By the end of this activity, you should be able to:
- Classify your device in terms of R compatibility.
- Select an appropriate R workflow (local vs. cloud).
- Install the R software and script editing (eg, the built-in R editor or R Commander package) onto their computer or
- Access R via a cloud platform (eg, Google Colaboratory) and Jupyter Notebooks.
- Execute a basic setup path and verify it works
- Launch R and selected script editor, enabling students to begin using R for work with R code and R commands.
- Explain why your chosen setup is appropriate.
- Why local or cloud-based platform — or sometimes both! — to ensure consistent access to R for coursework during the semester.
What’s on this page
Before you begin
This page just gets you through to workflow with minimal explanation. Please see the more detailed treatment at Install R in Mike’s Biostatistics Book for details on why and how to install R, and Use R in the Cloud, also Mike’s Biostatistics Book for instructions on how to run R in the cloud, eg Google CoLab.
1. What Kind of Computer Do You Have?
Figure 1. Suggested flow chart for R installation, Install R, Mike’s Biostatistics Book.
Task 1: Identify your device and architecture (Fig 1).
Check one:
☐ Intel-based macOS
☐ Apple Silicon (arm64)
☐ Windows 10/11 Home or Pro edition
☐ Windows 10/11 S mode edition
☐ Linux machine
☐ Chromebook
☐ iPad / tablet
☐ Smartphone
Note 1: “Computer” for our purposes refers only to devices running Linux, macOS, or Windows operating systems. R and related R packages can not be installed — gracefully, at least — to ChromeBooks, iPads or other tablets, nor onto smartphones like iPhone or Android phones. While these devices are very much computers — and, arguably, much more capable than many of the consumer level computers prior to 2010s — R and related support software were not written for the kinds of processors that run tablets and smartphones. It is recommended that users of such devices rely on running R “in the Cloud,” eg, Google CoLab.
Task 2: Identify installation path (Fig 1).
You can install R locally if:
- macOS (Intel or Apple Silicon)
- Windows Home/Pro (x64)
- Most Linux systems
You should strongly consider cloud-based R if:
- Windows S Mode
- Chromebook, iPad, smartphone
- You cannot install software
2. Setup R on your computer for local use.
CoLab, skip this step.
Required for all macOS users (do this first): Install XQuartz (provides X11 support used by some R components). Windows and Linux users proceed to install R.
Before we can begin our work we need to set up access to the R programming language (Task 1) and provide a script editor (Task 2). Students may choose to install R onto their personal computers (Task 1 and Task 2) or use R in the Cloud (Task 3), with no need to install software.
Note 2: Remember, this is just a quick guide. A more complete set of instructions is available at Install R in Mike’s Biostatistics Book.
Step 1. Instal R program.
Task 1. Download and install R from the official source, R-project.org.
Select (direct links provided)
- Download CRAN
- 0-Cloud https://cloud.r-project.org/
- From download and install R, select link to correct operating system.
Task 2. Set up script editor
R installed to your computer comes with a limited user graphical interface called the console and all R commands are entered and run from a single line, or command line interpreter. No one can reasonably be expected to code this way, one line at a time.
The base installation on computers includes a script editor, Option A. A script editor keeps your R work organized by letting you write, save, and rerun code. It turns R into a practical workspace for biostatistics, data management, and data analytics. At the end of this exercise, you’ll have done enough if you’ve installed R and can access and use the built-in script editor.
Option B. For students in my biostatistics course I highly recommend install an R package called R Commander, or Rcmdr for short. This package provides a graphical user interface with provides easy access to many R statistical and data processing functions via menu driven lists.
Like RStudio, R Commander also provides windows or parts, each providing access to different functions in a biostatistics workflow. R Commander installation instructions are provided in the Appendix of Mike’s Biostatistics Book.
For more about R packages, see Part 05. R packages: Making R do more.
Note 3: Why not RStudio? Most users of R work with an IDE like RStudio or Visual Studio. Both provide a complete environment for working with code, but add significantly to the learning curve — students frequently confuse RStudio with R, at least initially in those crucial first experiences with R. The built-in script editor is enough, but lacks support for use of Rmarkdown, hence, we still recommend R Commander.
Option A. Open built-in script editor
Start R, from the console select
- macos: File > New document
- windows: File > New script
Verify script editor functionality. You should see a script window (Fig 2).
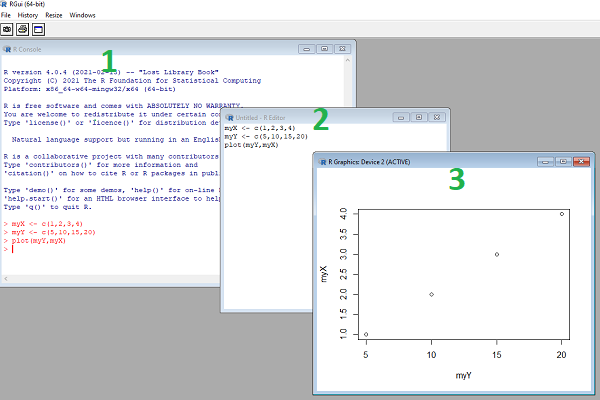
Figure 2. Screenshot of RGui.exe (1), script editor (2), and results of plot() (3) on WinPC, Figure 5 in Install R, Mike’s Biostatistics Book.
Example code
myX <- c(1, 2, 3, 4)
myY <- c(5, 10, 15, 20)
plot(myY, myX)
To run code in script editor:
- One line at a time, point cursor on the line, then
- macOS: Cmd+ Return keys
- Windows: Ctrl + R keys
- All at once, select all (Cmd + A on macOS, Ctrl + A on Windows), then:
- macOS: Cmd + Option + Return keys
- Windows: Ctrl + Alt + R keys
Note 4: Confused about keyboard shortcuts? See our short page about Keyboard shortcuts.
You’ll be prompted to select a Mirror site to download the R package.
Option B. Install R Commander (Rcmdr)
Note 5: Remember, this is just a quick guide. A more complete set of instructions is available at Install R Commander in Mike’s Biostatistics Book.
Step 1. Open R, copy and paste line of code and run (Return key):
install.packages("Rcmdr") # tap return key to run
Note 6: The hashtag, #, is used to tell R that a comment is added and is not interpreted by R as a command to run instructions. Judicious use of comments helps make code readable.
You’ll be prompted to select a Mirror site to download the R package. Choose the default option, 0-Cloud; in the R console you’ll see messaging informing you of the status of the download. Look for red “Error” messages. If received, double-check copy/paste and if need be, retype the code by hand, then try again.
After downloading, all you will see at this stage is a new line started with the R prompt. Be confident — all is well!
Step 2. Start and verify R Commander functionality.
At the R prompt, type or copy/paste line of code
library(Rcmdr) # tap return key to run
On first run, the R console will fill up with red text, indicating additional packages are to be added (if prompted, say yest to download and install), and to indicate the numerous additional packages R Commander needs to run (Fig 3).
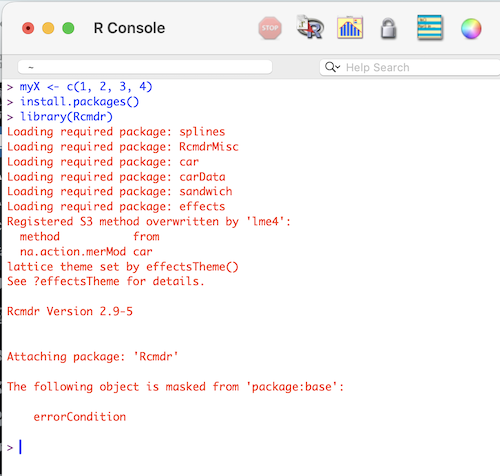
Figure 3. Screenshot or RGUI console as R Commander library starts (macOS).
As R Commander starts, you should see (Fig 4):
- A script window
- A menu-driven interface
- Output and message panels

Figure 4. Screenshot of basic R Commander session in RStudio on macOS.
Note 7: macOS users will also see XQuartz start. R Commander uses Tcl/Tk, which requires the X11 windowing system provided by XQuartz.
Checkpoint Questions:
What is the advantage of a script editor over typing one line at a time?
What problem does a GUI like R Commander solve for beginners?
R, and the numerous packages which extend the capabilities of the base R language, is built by thousands of programmers to handle data processing and statistics problems, from very simple calculations to use of sophisticated optimization algorithms. Basic installation instructions are provided in the Appendix of Mike’s Biostatistics Book.
- Install R and
Rcmdron your computer (eg, laptop or desktop running macOS or Windows 10/11 Home or Pro versions). - If you do not have a computer, then your access to R will be in the Cloud
3. Setup Google CoLab access
Running R in a service like Google Colaboratory is an excellent option for (bio)statistics students because it allows students to focus on statistical concepts rather than setup hassles. It is also the only practical option is the student intends to work from an iPad or SmartPhone device. While I recommend Google CoLab, other options are available, and detailed instructions are provided at Use R in the Cloud in Mike’s Biostatistics Book.
Note 8: These abbreviated instructions for accessing Google CoLab are drawn and adatped from numerous sources at several blogs and forum posts.
To use R in Google Colaboratory for the first time, follow these simplified steps using your existing Gmail account .
1. Initial Sign-in and Access
- Since you have a Gmail account, there is no separate “sign up” process for Colab.
- Open your web browser and go to the Google Colab homepage
- Sign in with your Gmail credentials when prompted.
- Once logged in, a welcome dialogue will appear; click “New Notebook” in the bottom right corner.
2. Configure for R Language
- By default, Colab notebooks use Python. You must manually switch the environment to R.
- In the top menu of your new notebook, click on Runtime.
- Select Change runtime type from the dropdown menu.
- In the “Runtime type” dropdown, select R (it will likely show “Python 3” initially).
- Click Save.
3. Verify and Run R Code
- The notebook is now ready to process R commands instead of Python.
- Type a simple R command into the first cell, such as the simple script above.
- Click the Play icon to the left of the cell or press Ctrl + Enter to execute the code.
- The output will appear directly below the cell once the cloud resources are allocated.
4. Optional: Quick Access from Google Drive
If you want access to Google sheet data files or to create R notebooks directly from Google Drive, the simplest way is to first link in the default Python environment, then choose R Runtime.
- Start a New Notebook. Sign in at CoLab with your Google account.
- Click “New Notebook” at the bottom of the pop-up window or select File → New notebook from the top menu.
- Choose the R Runtime. By default, Colab uses Python. To switch to R:
- Click on the Runtime menu at the top.
- Select Change runtime type.
- In the “Runtime type” dropdown, choose R.
- Click Save.
5. Link to Google Drive. This assumes you haven’t started the R runtime yet. Mounting Google Drive is accessible via Python and allows you to access your personal files directly from the notebook.
- Simplest, use sidebar:
- Click the Folder icon on the left sidebar to open the File Browser.
- Click the Google Drive icon (labeled “Mount Drive”).
- Follow the prompts to permit access and sign in.
- Code: Enter and run the following Python script in a code cell:
from google.colab import drive
drive.mount('/content/drive')
Now, start your R Runtime and proceed with your R code.
drive.mount is for Python; for R, it’s often easier to use the sidebar button or the ‘googledrive’ package for specific tasks. See Part 07. Working with your own data for instructions.
4. Page quiz
Quiz01 – Mike’s Biostatistics Workbook
Part 01. Install R and R Commander